Chapter 9
Machine Shop Know How
Most people don’t recognize opportunity because it’s usually disguised as hard work.
—Unknown
Introduction
Being aware of existing devices and solutions forms the basis of intelligent problem solving—a skill that all good machinists need. This chapter will help with that goal by first, demonstrating several dozen shop techniques, repair methods and shop-made tools for solving specific problems, and second, by presenting an assortment of mechanical components, mechanisms, and alternate construction methods that any machinist will find useful.
Section I – Layout & Machining Techniques
How to Lay Out a Bolt-Hole Pattern Using Chords
Although circular bolt-hole patterns are usually drilled using a rotary table or the x-y coordinates on a milling machine, sometimes there is a need to lay out a bolt-hole pattern without the use of these tools. This can be done accurately using chords—the line which joins the end points of an arc or two points on a circle. Here is how to lay out a 6-inch diameter pattern of 7 bolt holes:
- Locate the center of the bolt-hole pattern, center punch it, and scribe the 6-inch bolt diameter circle using one leg of the divider in the punch mark.
- Mark and prick punch the initial bolt-hole location, which is usually at the 12 o’clock position.
- Look up the chord length for a 7-hole pattern in Machinery’s Handbook. You’ll find it is 0.433993, rounded to 0.4339 inches for a 1-inch circle, or 6 ´ 0.4339 = 2.6034 inches for the chord of a 6-inch circle.
- Set your dividers to 2.603 inches, put one divider point in the initial hole punch mark, and step off the remaining hole points. See Figure 9-1 (top).
If the hole pattern needs to have the top two holes perpendicular to the vertical—flat on top—look up the chord for a 14-hole pattern. Next, multiply this chord number by the diameter of the circle and step off 14 points beginning at the top vertical point, or 12 o’clock position. Then use alternate points to make the 7-hole pattern as shown in Figure 9-1 (bottom).

Figure 9-1. Laying out a 6-inch diameter 7 bolt-hole pattern using chords.
Boring vs. Turning
When one existing cylindrical part must fit into a hole in a second part, and that hole is yet to be made, there are two alternative methods, or as Tony Soprano would say, “We can do this the easy way, or we can do this the hard way.”
- Drill the second part to the correct size hole. This is a good idea, but likely not possible because the cylindrical shaft diameter does not match any of the drills on hand, so instead the hole must be bored to size. This is the hard way.
- The easy way is to drill the hole in the second part with an available drill, and then turn the cylindrical part down to size to match the drilled hole. Drilling is always faster and easier than boring. See Figure 9-2.
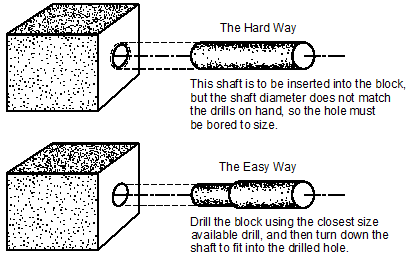
Figure 9-2. Boring vs. turning when fitting together two parts.
Broaching a Single Keyway
Here is the procedure for broaching a single keyway in an arbor press:
- Select the broach and choose the bushing which matches the workpiece hole diameter and hole length. To cut a full-length keyway groove, the bushing must be as long as the length of the hole in the work.
- Insert the bushing into the work, and insert the broach into the bushing. Then place the work in the arbor press so the ram of the arbor press bears on the top of the broach. Make sure that the broach is perpendicular to the work and the arbor ram face. At this and all later steps, add cutting fluid to the broach teeth, sides and back.
- With the arbor press, force the broach through the work. Use smooth, even pressure on the broach and do not stop in the middle of a stroke. As the broach completes its cutting stroke and exits the bottom of the work, catch the broach so it does not fall and get dinged. Never pull the broach backwards up through the keyway. This dulls the broach teeth.
- Clear the chips from the broach.
- Again insert the broach into the top of the bushing and place one or more L-shaped shims behind the broach in the keyway. The shims move the broach deeper into the keyway to make the next cut.
- Repeat the downward cutting stroke, catching the broach as it emerges from the work. Remember, do not allow the broach to drop onto the floor.
- Repeat Steps 5 and 6 until the keyway is the required depth, Figure 9-3.
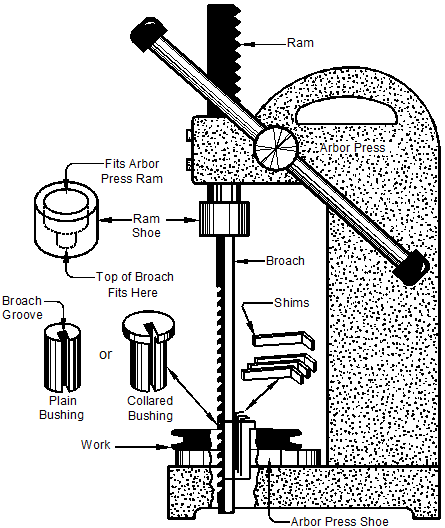
Figure 9-3. Cutting a keyway with a broach in an arbor press.
Hundreds of pounds of force are applied to the broach to make it cut. Broaches for cutting extra-long keyways advance their teeth 0.030–0.035 inches along a 9-inch length, instead of the more usual 0.050-inch advance. This reduces the force on the broach when a long keyway engages many teeth at once. If you are broaching in a hydraulic press, which is required for wide broaches and extra-long keyways, monitor the pressure gage on the hydraulic press cylinder to insure that the broach is not jammed and you are not applying excessive force to the broach. Too much force can snap the broach and send pieces of it flying around the shop.
Lubricants for Broaching
See Table 9-1.
|
Workpiece Material |
Lubricants |
|
Aluminum |
Kerosene or aluminum tapping fluid |
|
Brass |
Dry, but lube back of broach in bushing |
|
Bronze |
Oil |
|
Cast Iron |
Dry, but lube back of broach in bushing |
|
Steel |
Cutting oil |
Table 9-1. Cutting lubricants for broaching. With all broaching materials,
lubricate the back of the broach bushing where the broach slides.
Broaching Trouble Shooting
The most common broaching problems are the result either of misalignment, lack of lubricant, dull broaches, using the wrong tool, or using the wrong size broach. Here are the solutions to these problems:
- Proper alignment of the arbor press ram, broach and bushing are critical to avoiding drift, deflection, and breakage of the broach. Take the time to get the ram shoe, broach and bushing carefully aligned.
- Apply lubricant to all four sides of the broach as it enters the bushing, not just on the cutting teeth.
- Make sure that your broach is sharp. A dull broach is subject to high cutting forces and may snap.
- Use the right tool. Good practice is to use a ram shoe that positions the broach against the face of the arbor press ram. This reduces the chances of deflection. On larger or extra-long broaches, use a hydraulic press to get the force needed.
- Extra-long keyways require extra-long broaches, shims and bushings. There is a maximum and minimum length cut for each broach which is specified by its manufacturer. Two or more workpieces may be stacked to establish the minimum length of cut.
- And remember, never attempt to broach any material harder than Rockwell Rc35. Metals with higher Rockwell numbers are harder than the broach and will not be cut, and they will damage the broach.
Why Shaft Key Metal Should Not Be Upgraded
As equipment wears, the torque transmitted by shaft keys often increases. Because keys are in shear, they fracture along the line between the shaft and the load. To work around this problem, some well-meaning maintenance man may decide that to stop key breakage, he need only make the key of stronger material than the original one, so he replaces the original steel key with one of 4130 steel. Though keys of this high-strength alloy can be made from shanks of brazed tungsten carbide lathe tool bits, it is not a good idea. When this new key is put under load, it does not shear; it tears the keyway out of the shaft—ruining the shaft. Keys are not only devices to connect shafts with their loads, they are mechanical fuses. Do not upgrade the shaft key metal.