
- Preface
- Acknowledgements
- Chapter 1: Welding Overview
- Chapter 2: Safety
- Chapter 3: Terms, Joints, & Edge Preparation
- Chapter 4: Tools & Welding Tables
- Chapter 5: Shielded Metal Arc Welding
- Chapter 6: Wire Feed Welding
- Chapter 7: Gas Tungsten Arc Welding
- Chapter 8: Oxyacetylene
- Chapter 9: Controlling Distortion
- Chapter 10: Cutting Processes
- Chapter 11: Brazing & Soldering
- Chapter 12: Common Problems & Solutions
- Chapter 13: Design Tips
- Chapter 14: Fabrication & Repair Tips
- Chapter 15: Tools & Tooling
- Chapter 16: Pipe & Tubing
- Chapter 17: Metallurgy
- Chapter 18: Power Supplies & Electrical Safety
- Chapter 19: Bending & Straightening
- Index
- Credits
Chapter 12
Common Problems & Solutions
Creative thinkers make many false starts, and continually waver between unmanageable
fantasies and systematic attack.
—Harry Kepner
Introduction
As mentioned in the opening of this book, there are few genuine welding secrets, but there are many valuable and little known techniques, methods and procedures that can make any welding job go smoother. Collectively called Know-How, these time, money, and aggravation-saving tips can be the difference between success or failure, profit or loss; between removing that snapped drill and saving a part or giving up and throwing the part away. Many of these tips are based on science, and others on pure experience. You’ve probably seen some of the following welding problems, and with this chapter—you’ll now have the solutions.
Section I – Removing What’s Stuck
Frozen and Broken Bolt Removal Methods
When a rusted, seized or broken bolt or tap is stuck and cannot be removed, besides using a traditional screw extractor, sometimes called an easy out, there are several other solutions.
- If the assembly holding the bolt will tolerate heat without damage, use an oxyfuel torch to heat the bolt head to just below red heat. A rapid water quench or compressed air stream will further help with the screw removal. This method works because the heating and cooling will not occur evenly between the bolt and the part, which results in a differential expansion and contraction that breaks the bonds between the parts. Two or more heating and cooling cycles may be needed.
- If a slotted head or Allen cap screw socket is damaged or missing, place a nut over the bolt head, or the remaining stub end, clamp this nut in place, and fill the inside of the nut with weld metal. This weld will join the nut to the bolt stub. Then, put a wrench or socket on the nut and back out the broken bolt. This method simultaneously provides a new gripping point and applies heat to the fastener.
See Figure 12-1. SMAW, FCAW, GMAW and GTAW may be used on fasteners of 1/2" diameter or larger. GTAW is needed for smaller fasteners because it provides better control.
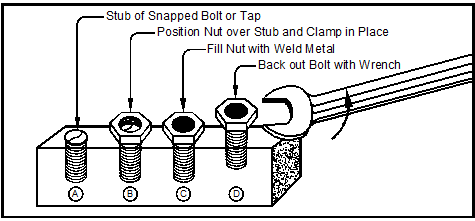
Figure 12-1. Bolt removal by welding a nut onto the frozen bolt stub.
- When the tap or fastener is snapped off below the workpiece surface, GTAW can be used to extend a column of metal from the broken off fastener to the surface of the workpiece. A nut can then be attached to the broken fastener. See Figure 12-2. The GTAW tungsten electrode must be held coaxially with the hole axis so it does not attach weld metal to the sides of the hole, but just to the broken tap or fastener.
Filler metal does not easily bond to the internal threads for two reasons:
- The threads are much cooler than the weld metal.
- Capillary attraction of the weld metal to itself makes it relatively easy to form a column up to the top of a threaded hole without attaching weld metal to the threads.
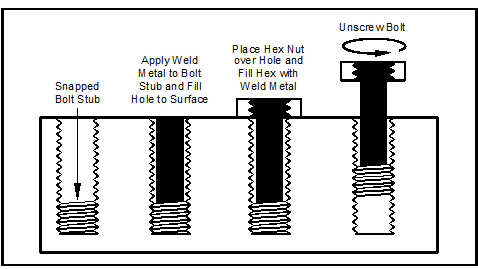
Figure 12-2. Using weld metal to extend a broken fastener or tap to the workpiece surface.
Figure 12-3 shows the types of fasteners and taps that can be removed using this welded-on nut extraction method.
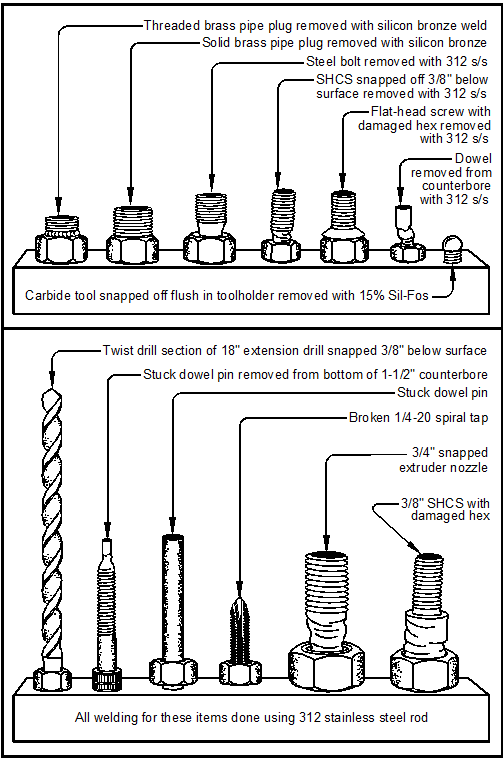
Figure 12-3. Frozen or damaged items removed from work using GTAW.
Removing Dowel Pins without Welding
There are several removal techniques that, though they do not use welding, every welder should know.
For dowel pins that are stuck in blind holes, the following approach avoids exposing the workpiece to the welding heat of GTAW and instead uses a piston and hydraulic force to free the dowel. Here are the steps:
- Center drill and then drill a hole through the center of the stuck dowel pin. For a 1/2" diameter dowel, drill a hole about 0.015" less than 1/4" diameter to prepare for reaming. Use a milling machine and a twist drill with brazed carbide tips. A solid carbide drill could also be used, but it is likely to snap because solid carbide drills are very brittle. See Figure 12-4 (A & B).
- In a mill, ream this hole to 1/4" diameter. See Figure 12-4 (C).
- Using a syringe, fill the reamed hole in the stuck dowel pin with grease. Leave a little length of the reamed hole empty of grease to give the 1/4" dowel pin good starting alignment. See Figure 12-4 (D).
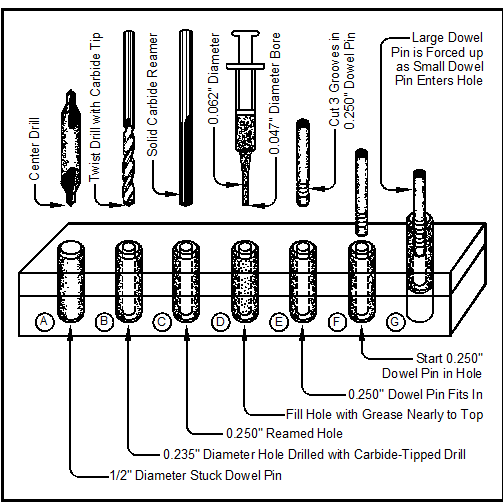
Figure 12-4. Removing a stuck dowel pin using hydraulic force.
- Prepare a 1/4" dowel pin by cutting three 0.020" deep rings, or grooves, just back from one end of the pin using a lathe and a carbide cutter. These rings reduce grease leakage around the pin. See Figure 12-4 (E).
- Insert the smaller dowel into the hole drilled into the larger dowel pin. See Figure 12-4 (F). Use an arbor or hydraulic press to force the smaller dowel through the larger one.
- The stuck dowel pin will be forced out of its hole and can be removed with a pair of Vise-Grip-style pliers. See Figure 12-4 (G).
WJKH Removing a Snapped Extension Twist Drill
This problem involves a steel plastic-injection mold. Because the machinist failed to clear the 1/2"318" long extension drill, the twist drill section at the bottom of the hole snapped off from its 1/2" shank. See Figure 12-5 (A & B).
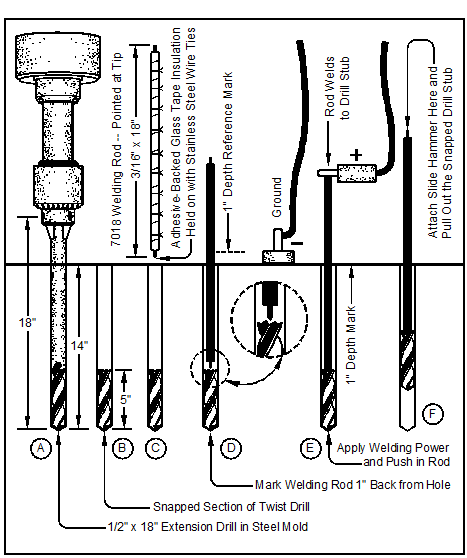
Figure 12-5. Removing a snapped extension twist drill from a steel mold.
Here are the steps to remove the stuck drill tip:
- Grind a point on a 3/16" diameter 7018 SMAW welding rod. This will get the arc started since a scratch start is not possible inside the hole. Starting one inch back from the point, wrap the welding rod with an adhesive-backed fiberglass tape and secure the tape with fine stainless steel wire ties in 8–12 locations along the rod. Bend the twisted section of the wire ties so they lie flat against the rod coating. The stainless steel ties keep the fiberglass tape in place when the rod is hot. The taped welding rod will slide freely into the 1/2" diameter drilled hole. See Figure 12-5 (C).
- Slide the rod into the hole so it bumps the shank of the snapped twist drill and make a depth reference mark on the fiberglass insulation tape one inch up from the surface of the hole. See Figure 12-5 (D).
- Connect only the positive terminal of an SMAW power supply to the exposed end of the welding rod. See Figure 12-5 (E).
- Set the SMAW constant voltage welding power to supply 250 A DC.
- Turn on the welding power supply and hold the negative power supply terminal in your left hand.
- Touch the negative power supply terminal—the ground line—to the steel mold, then push in the welding rod so it arcs against the stuck drill inside the mold. The reference mark on the welding rod shows when the rod has burned down one inch. This takes 2–3 seconds. Then remove the negative terminal to stop the arc.
- Disconnect the positive terminal from the rod and turn off the SMAW welding supply.
- Attach a slide hammer to the outside end of the welding rod and pull out the rod with the snapped drill stub welded to it. See Figure 12-5 (F).