
- Preface
- Acknowledgements
- Chapter 1: Welding Overview
- Chapter 2: Safety
- Chapter 3: Terms, Joints, & Edge Preparation
- Chapter 4: Tools & Welding Tables
- Chapter 5: Shielded Metal Arc Welding
- Chapter 6: Wire Feed Welding
- Chapter 7: Gas Tungsten Arc Welding
- Chapter 8: Oxyacetylene
- Chapter 9: Controlling Distortion
- Chapter 10: Cutting Processes
- Chapter 11: Brazing & Soldering
- Chapter 12: Common Problems & Solutions
- Chapter 13: Design Tips
- Chapter 14: Fabrication & Repair Tips
- Chapter 15: Tools & Tooling
- Chapter 16: Pipe & Tubing
- Chapter 17: Metallurgy
- Chapter 18: Power Supplies & Electrical Safety
- Chapter 19: Bending & Straightening
- Index
- Credits
Chapter 4
Tools & Welding Tables
Education is learning to use the tools humanity has found indispensable.
-Josiah Royce
Introduction
To know what tools and equipment are needed for a welding job, you need to understand the steps required in the fabrication process:
- Get or make a fabrication sketch or drawing.
- Develop a well thought out welding procedure.
- Gather all necessary welding equipment including measuring tools.
- Gather all materials to be welded.
- Make patterns, jigs, templates and fixtures, if needed.
- Put together a cut list.
- Lay out and cut materials.
- Clean metal areas to be welded and make the edge preparations.
- Position and clamp materials prior to welding.
- Tack weld assemblies, check dimensions, setup and squareness.
- Place the final welds and assemble the fabrication.
- Paint the fabrication promptly to avoid rust formation.
Section I – Hand Tools
Measuring Tools
- Framing, carpenter’s, cabinetmaker’s and combination squares – Use the largest square that fits the work. The combination square is convenient for the layout of 45º corner cuts and short, parallel lines. Grind the outside corners off the carpenter’s and cabinetmaker’s squares to allow them to fit snugly into work corners that have a fillet weld in place. See Figure 4-1 (A, B, C & D).
- Builder’s and torpedo levels – Use the larger builder’s level whenever possible because it is more accurate and measures over a longer span. Use the torpedo level wherever the builder’s level won’t fit. See Figure 4-1 (E & F).
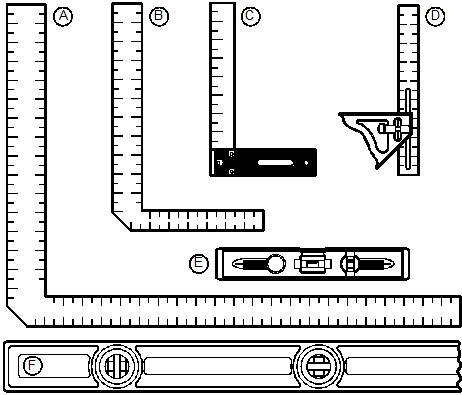
Figure 4-1. Common measuring and leveling tools for welders: (A) framing square, (B) carpenter’s square, (C) cabinet maker’s square, (D) combination square, (E) torpedo level and (F) builder’s level.
- Compass and dividers – For scribing circles or stepping off a series of equal intervals.
- Steel measuring tape – The most convenient sizes are the 16' and 24' tapes. These are also useful for measuring curved surfaces.
- Precision steel rules – Available in lengths from 6–72", these steel rules are for measuring along or drawing a straight line.
Metal Marking Tools
The following items will mark metal:
- Snapped chalk lines, which use a mason’s string.
- Welder’s chalk, also called soapstone.
- Ball point metal marking pen.
- Single center-punch mark or a line of center-punch marks.
- Silver Streak welder’s pencil.
- Felt-tip pen, such as a Sharpie.
- Aerosol spray paint.
- Scribed lines either on bare metal or on layout fluid.
Use welder’s soapstone for marking rough dimensions, bend lines, and to indicate cutting lines that need to hold up under cutting torch heat. A line of center-punch marks can be more accurate and will also withstand torch heat. For very accurate layout lines, spray paint the metal in the area of the layout lines and use a scriber to scratch through the paint to make the lines. Alternatively, machinist’s layout fluid—available in red or blue—can be used to make the scribed lines visible. Although these lines will not hold up under torch heat, they can be essential to laying out non-torch cutting lines. Felt-tip pens can be used in place of layout fluid to darken the metal to better show scribed lines. Do not use scribe marks to designate bend or fold lines since they are stress raisers and the part will eventually fail along the scribed line.
Welding Hand Tools
- Chipping hammer to remove welding slag, particularly for SMAW.
- Files for bringing an oversized part down to exact dimensions, removing a hazardous razor edge or burr, and smoothing the ends of wire-feed electrodes before feeding them through the torch liner.
- Ball pein hammer and cold chisel to break tack welds.
- Pliers, such as Channel Locks, for moving hot metal safely.
- Wire cutters to trim electrode wire (GMAW and FCAW only).
- Hack saws for slow, but accurate metal cutting.
- Wire brush for cleaning welds. See all these tools in Figure 4-2.
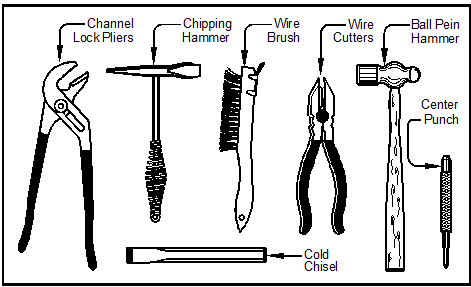
Figure 4-2. Welding hand tools.
Clamps
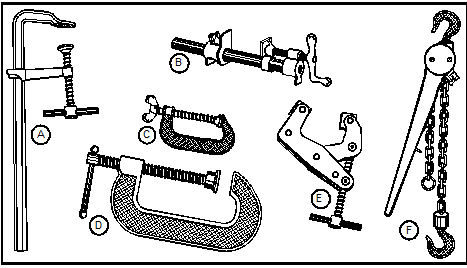
Figure 4-3 shows general purpose clamps for welding. These clamps include:
 :
:
(A) bar clamp,
(B) pipe clamp, (C & D) C-clamps, (E) KantTwist clamp and (F) come-along.
- C-clamps.
- Bar clamps and pipe clamps are used to clamp across long spans.
- Come-alongs, also called cable pullers, are used to pull large, long or stiff parts into position. These are particularly good on structural steel for pulling frames into square.
- KantTwist-type heavy-duty clamps. Figure 4-4 shows how to tighten KantTwist clamps using a wrench. Pulling them up without a wrench does not take full advantage of their clamping power.
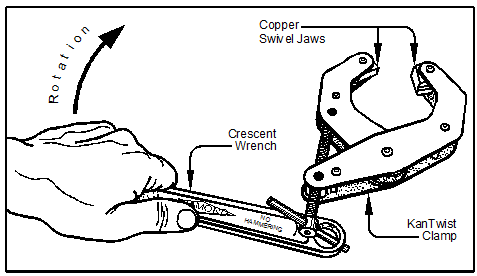
Figure 4-4. Method to tighten KantTwist clamps.
- Bessey welding clamps are heavier and stronger than general-purpose welding clamps, and more expensive, but usually worth it. See Figure 4-5.
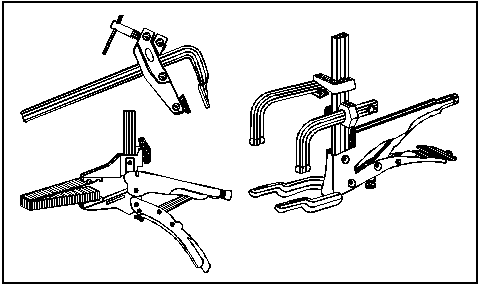
Figure 4-5. Several designs of Bessey heavy-duty welding clamps.
- Corner-clamping fixtures, such as the Bessy corner clamp in Figure 4-6, make getting accurate right-angle joints easier. Although these clamps are most often used sequentially to weld up corner joints, sometimes four or more are positioned on a rigid base to form a fixture for production work. These clamps have aluminum bases and copper-plated screws so welding spatter does not stick to them.
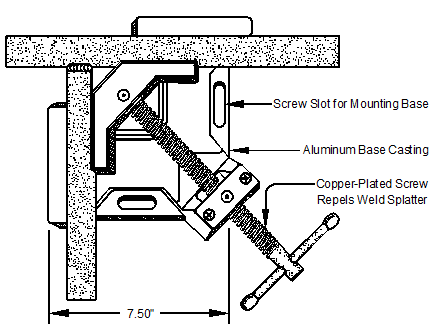
Figure 4-6. Bessey corner clamps hold work firmly in position for welding at right angles.